
Congratulations on your Workspace solution! This guide will take you through the Administration module, and how you can configure the solution and get it ready for use.
Getting access to setup AD import (please scroll down to find the section about logging in without AD)
Please follow the following steps to access the solution and the Administration module:
You’re now in the Administration part of the solution and can start the configuration.
We recommend connecting your Workspace solution to your AD straight away, to import users and get single-sign-on.
If you prefer to handle your users manually, please scroll down to see the section regarding creation of users and/or upload of a file of users
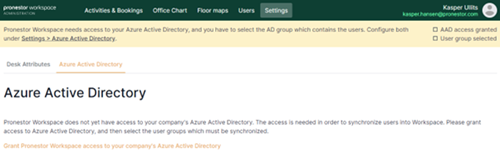
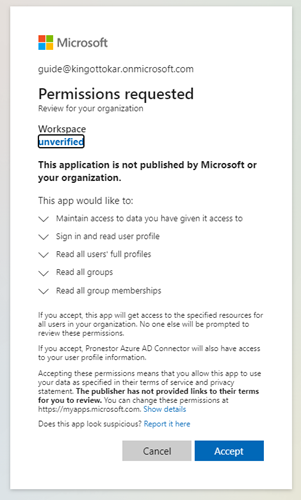
Select Settings in the top menu and then select Azure Active Directory.
Single-sign-on: must be activated by connecting your Azure AD.
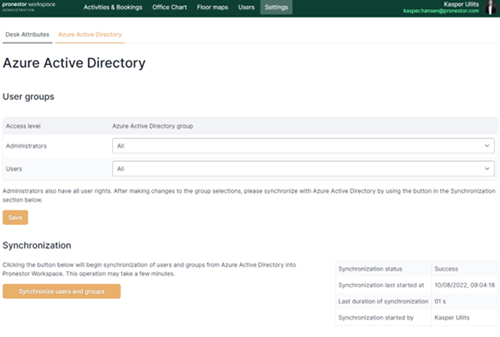
Your users will now be maintained from your AD. The solution will automatically update users every night at 00:00 CET.
After activating Single-sign-on, we recommend creating the attributes for desks, as you will need them later.
You're now in the Administration part of the solution and can start the configuration.
To create users, select the tab Users in the green bar at the top. You now have 3 options; Users, Import users, and Create user.
Creating a few users: Select Create user, if you only need to create a few users one-by-one.
Please note that Workspace will not send a notification to the user. We recommend you send an email to the created user afterwards, with information about the solution and how they can get access.
If relevant, please feel free to use this template for the email:
Dear colleagues,
A profile has been created for you for the Workspace solution. To get access please go to https://my.pronestorworkspace.com and follow these instructions:
Now you have access to your Workspace solution, and can start by booking a desk, setting your status etc. to make it easier to collaborate in a hybrid setup.
After creating your users, we recommend creating the attributes for desks, as you will need them later.
Creating several users at once: Select Import users, if you need to create several users, and don’t want to do it one-by-one. This will allow you to upload a file with users. If you select Download sample file, you’ll get an example on how the file must be structured.
The file must contain the following data:
Please note the requirements for the file, which can be seen in the Import users section.
When you have the file ready for import, select Choose file with users and select your file for upload.
Please note that Workspace will not send a notification to the users. We recommend you send an email to the created users afterwards, with information about the solution and how they can get access. To help you with this, please go to the section about creating users one-by-one. Here you’ll find a template you can use to inform your colleagues.
Editing a user: To see a list of all users in the solution, select Users. If you need to see information about a user, select the user’s name. You will now see the profile and you can edit data. If needed, you can disable and delete the user.
Upload profile picture: This is also done on the user’s profile. It must be done by an Administrator; users can’t do it themselves.
After creating your users, we recommend creating the attributes for desks, as you will need them later.
Attributes: are the different types of equipment or other relevant information about a desk, that can be used to find a desk with the proper equipment. To create the attributes, you must have an overview of all the different types of equipment/information that are available on all the different desks.
You have just created your first attribute and can continue with the rest on your list. The attributes will be added to the list above “Add a new attribute”. If you need to change or delete an attribute, simply select it from the list of attributes and you can edit it. You will also be shown which desks this attribute has been added to.
Creating your location and units
You can now proceed to create your different locations, units and areas. Before you start, please consider the best structure for your office/locations. When creating your locations and units, consider how many floors you have, how large they are and if they have a natural split into smaller sections. E.g., based on departments or the geographical orientation of the location. This can make it easier for users to navigate, and it will also impact the floor maps you create for the solution. Please scroll down to see the section regarding floor maps.
To do this, please follow these steps:
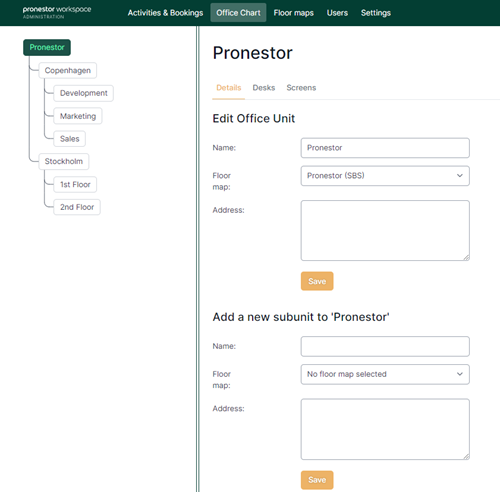
Now you can proceed to add all the units/subunits you need. Please note that you can create as many units as you want below you main unit, as well as add subunits to subunits. Just select the relevant subunit on the left side and you can now add a subunit to the subunit.
In this screen dump, you can see that Sign In Workspace is the main unit. With offices in 2 different cities, we have added those as subunits to the main unit. In both cities, we have chosen to divide the offices into different areas, to help users find their way. These areas are added as subunits to the subunits.
Once your different locations and areas has been created, you’re ready to add desks to each. Please be aware, that desks should always be added to the lowest levels, to ensure best searchability in the user interface: :
Your first desk has been created – you can now proceed and add all desks in the different areas. Should you need to edit a desk, simply select it in the list below. When editing a desk, you have several options:
If the desk has been mapped to a floor map, you can see which floor maps.
Generate QR codes for desks
Once you have created the desks for your different office units, you can generate QR codes for one, several or all office units. Once generated, you can download a PDF with the QR codes or you can download a .csv file with the URL for each QR code. The PDF can be printed as stickers and put on each desk. If you want to create branded stickers or a different solution, we recommend downloading the .csv file instead. The URLs can be converted to QR codes by using online tools, and then embedded in the design you want.
Users can scan the QR codes to book an available desk or confirm an existing booking of the desk.
To generate the QR codes, start by selecting the right office unit. If you want to generate the codes for all desks in your solution, simply select the top unit. If you want to use QR codes for a unit + related subunits, select the highest level of unit. This will allow you to activate the QR codes for the main unit + the subunits.
Please follow these steps:
Once you have generated the QR codes, mounted them at the desks etc., and you’re ready to launch it in your organization, you can enable a QR scanner in the Workspace solution:
In Workspace Admin, go to Settings:
Changing or updating QR codes
The QR Assigner app is used to establish connections between desks and QR codes.
Use it to assign new QR codes to desks that have been added or have had their QR codes replaced due to damage.
Use it to move QR codes from one desk to another when desks have been switched around.
Additionally, use it to verify if a QR code is assigned to the correct desk.
Please note that the floor maps need to be updated separately.
You can find a link to the QR Assigner app at the bottom of your Workspace profile page. To access the profile page, click on your profile icon located in the top right corner of the Workspace. The link is visible only to administrators and can be accessed on mobile devices only.
By having floor maps in the solution, it’s usually much easier for the users to locate desks and find their way around.
Recommendation
Based on our experience, we have the following recommendations for different setups:
To get floor maps in the solution, please go to this guide to see how to get the files ready as well as the options for icons etc.
The floor maps will be created in the right format by the Sign In Workspace Support team and sent back to you.
Important tip! If you have 1 floor map covering an entire floor and other floor maps covering smaller sections of that same floor, you should just map the floor map for the entire floor. This mapping will then be reflected in the smaller floor maps as well.
Once you have received the floor maps, please follow these steps to map them:
*Tip! When you have marked a desk and chosen the proper desk in the drop-down, you can simply mark the next desk and enter the first letter of the desk on your keyboard. You will now see it in the drop-down and select Enter to select it.
Continue until you have mapped all desks and the select “Save”.
You can now proceed to upload additional floor maps and map them. Once you have completed this, you need to connect the floor maps to the different units in the Office chart:
Continue until you have chosen the floor maps for all relevant units.
When you have added floor maps, they are visible in the solution. However, it’s also possible to show a floor map on a large screen mounted at the entrance to a building or floor. This can be a help for users when they arrive at the location and need to find their way around.
To connect a screen, please follow these steps:
The screen will now show the floor map you have just chosen. If relevant, it’s possible to add several screens to one unit.
If you need to edit the content on the screen, e.g., update the floor map, simply select the right screen. You can now update the name, which unit it’s connected to or change the floor map. The screen will automatically update once you have selected Save.
Confirmation settings
By activating the Confirmation settings, users will be required to confirm their desk bookings in Workspace. If they don’t confirm the booking within a set time slot, the booking will be cancelled and the desk available for other users.
You can set the Confirmation settings per unit and have different settings on different units – or have confirmation on some units, and no confirmation on other units.
Follow these steps to activate the Confirmation settings:
If you e.g. set the confirmation window to 15 minutes before the booking starts and 15 minutes after the booking starts, the user will have a total of 30 minutes to confirm the booking.
TIP: If you want to have the same settings on all units, follow these steps:
Now, all the chosen units will have the same confirmation settings. If you need to change the settings, just change them at the top unit and the settings will automatically be updated on the other units.
Please note that a unit can only inherit settings from a unit in a straight line.
As default, all users can book all desks in Workspace. If this is inconvenient for your organization, you can activate the Booking permissions. This will allow you to decide which users can book in specific office units. This can be set per office unit, and office units without Booking permissions will still be bookable for all users.
Once activated, all desks will still be visible for all users. Desks that the user can’t book will be shown as grey. It’s possible to select the desk and see the status, but it will not be possible to book it.
For users who create group bookings, they will only be able to book in office units where all group members are allowed to book.
Please follow these steps to activate Booking permissions with manually created groups:
Continue to create all the groups you need.
Please follow these steps to activate Booking permissions based on AD groups:
Continue to add all the groups you need.
Follow these steps to add the groups to the relevant office units:
Please note that existing future bookings in the office unit will not be affected by this. Only new bookings will be affected by these restrictions.
If a user has a favorite desk which is suddenly not bookable by the user, it will remain on the list of favorites until the user removes it.
If you need to remove a group from an office unit, simply select Remove next to the group. This will not affect any future bookings made by members of the group. They will, however, be unable to create new bookings in the office unit.
Once you have used the solution for some time, data will be available for export. To export data from Workspace, go to the tab Data at the green bar at the top.
In the drop-down Data to export, choose between the following options:
Selecting Bookings will produce a file with all bookings of desks. If a desk hasn’t been booked, it will not appear in the data export.
Selecting Activities will produce a file with the different status’ your users have had – or will have.
After choosing the data you wish to see, select the desired dates in From and To.
Select Download CSV file.
You can now work with the data as you, please.
Should you need inspiration for the test, please check the User guide and perform different bookings. This will help you validate that the solution is configured as expected.